Jere's Techblog

Install Consul Hashicorp trough Powershell

The Consul Hashicorp DNS service is a frequently used and modern service. Enclosed you will find a Powershell Script to install the Consul-Client as a Windows-Service. The script also allows you to run a version update.

When using the script you have to adjust the variables in line 1-13. For the update only the version number has to be adjusted, which is based on https://releases.hashicorp.com/consul/.

The script creates and updates the following config Files:
\config\consul.hcl
\config\node_exporter.json

If you don’t need this, you can comment it out of the script yourself.

#Install/Update Consul Service
#21.09.2020   by J.Kühnis

#Consul Version  based on https://releases.hashicorp.com/consul
$CONSUL_VERSION = '1.7.5'
$CONSUL_URL = 'https://releases.hashicorp.com/consul'
$CONSUL_DIR = "$env:SystemDrive\Consul"
$consulfqdn = "fqdn.consul.server.company.example"
$domainfqdn = "fqdn.server.company.example"

# Load DatacenterLoc from Webrequest
[Net.ServicePointManager]::SecurityProtocol = [Net.SecurityProtocolType]::Tls12
$DatacenterLoc = (Invoke-WebRequest "http://fqdn.consul.server.company.example:8500/v1/kv/config/datacenter?raw=true" -UseBasicParsing).Content


#Windows Service params
$params = @{
  Name = "Consul"
  BinaryPathName = "$CONSUL_DIR\Consul.exe agent -config-dir=$CONSUL_DIR\config -data-dir=$CONSUL_DIR\data"
  DisplayName = "Consul"
  StartupType = "Automatic"
  Description = "Consul Hashicorp DNS Service."
}
#stop consul service, if exists
IF(get-service -Name $params.Name -ErrorAction SilentlyContinue){
    Stop-Service -Name $params.Name -Force
    do {
        Start-sleep 1
    }
    until((Get-Service -Name $params.name).status -eq 'Stopped')
    start-sleep 1
}

#Create Consul Folder
IF(!(Test-Path $CONSUL_DIR)){
    New-Item -ItemType Directory $CONSUL_DIR
}
Set-Location "$CONSUL_DIR"
#Create Subdir
$arraySubDir = @(
"data"
"certs"
"config")

$arraySubDir | %{
    IF(!(Test-Path "$CONSUL_DIR\$_")){
        New-Item -ItemType Directory "$CONSUL_DIR\$_"
    }
}

<# Set Download Proxy, if needed
$WebClient = New-Object System.Net.WebClient
$WebProxy = New-Object System.Net.WebProxy("http://your.proxy.url",$false)
$WebProxy.Credentials = $Credentials
$WebClient.Proxy = $WebProxy
#>
    #down
$WebClient.DownloadFile("${CONSUL_URL}/${CONSUL_VERSION}/consul_${CONSUL_VERSION}_windows_amd64.zip","$CONSUL_DIR\consul_${CONSUL_VERSION}_windows_amd64.zip")
$WebClient.DownloadFile( "${CONSUL_URL}/${CONSUL_VERSION}/consul_${CONSUL_VERSION}_SHA256SUMS","$CONSUL_DIR\consul_${CONSUL_VERSION}_SHA256SUMS")
$WebClient.DownloadFile( "${CONSUL_URL}/${CONSUL_VERSION}/consul_${CONSUL_VERSION}_SHA256SUMS.sig","$CONSUL_DIR\consul_${CONSUL_VERSION}_SHA256SUMS.sig")
get-content "${CONSUL_DIR}/*SHA256SUMS"| select-string  (get-filehash -algorithm SHA256 "${CONSUL_DIR}/consul_${CONSUL_VERSION}_windows_amd64.zip").hash.toLower()

#Unzip Download
Expand-Archive "${CONSUL_DIR}/consul_${CONSUL_VERSION}_windows_amd64.zip" "$CONSUL_DIR" -Force

#Add env var
$env:path += ";${CONSUL_DIR}"
[Environment]::SetEnvironmentVariable("Path", [Environment]::GetEnvironmentVariable("Path", "Machine") + ";${CONSUL_DIR}", "Machine")


#Create/Update ConfigFiles

### Create HCL Config File; consul.hcl ###
$hcl_config = "${CONSUL_DIR}\config\consul.hcl"
IF(Test-Path $hcl_config){
    Remove-Item $hcl_config -Force
}
New-Item $hcl_config

$hcl_filecontent = @(
'datacenter = ' + '"' + $DatacenterLoc + '"'
'retry_join = ["' + $consulfqdn + '"]'
    'domain = "' + $domainfqdn + '"'
'acl = {enabled = true, default_policy = "deny", enable_token_persistence = true }'
)
Add-Content -Path $hcl_config $hcl_filecontent


### Create node_exporter.json config file ###
$json_config = "${CONSUL_DIR}\config\node_exporter.json"
IF(Test-Path $json_config){
    Remove-Item $json_config -Force
}
New-Item $json_config


$body = [pscustomobject]@{
    services= @([ordered]@{
        name = "node-exporter"
        tags = @("monitor")
        port = 9100
    })
}
   
Set-Content $json_config ($body | ConvertTo-Json -Depth 3)

#register Consul as a WindowsService
IF(!(get-service -Name $params.Name -ErrorAction SilentlyContinue)){
    New-Service @params
}
Start-Service -Name $params.Name
Continue reading...

Get size of Citrix UPM Profile

With these few lines you get an evaluation of your profile sizes and the AppData, if you have redirectet this to a share.
The script is designed to check multiple shares. You only have to adjust the array “$ProfileFolders” and if necessary the variable “$folder1, $folder2”

#by J.Kühnis 18.12.2019
$ProfileFolders = @(
"\\TSProfileShare1\profile$",
"\\TSProfileShare2\profile$"
)

$infos = @()

Foreach ($folder in $ProfileFolders){
Write-Host $folder

Get-ChildItem $folder | ? { $_.Name -notmatch ".V2" } | % {
    
    Write-Host ($folder + "\" + $_.Name + "\ts\v3\prd\AppData")
   
    $folder1 = $folder + "\" + $_.Name + "\ts\v3\prd\AppData"
    $folder2 = $folder + "\" + $_.Name + "\ts\v3\prd\upm\UPM_Profile"
    IF (Test-Path $folder2) {
        $a = ((gci -Recurse $folder1 -Force | measure Length -s).sum / 1Gb)
        $b = ((gci -Recurse $folder2 -Force | measure Length -s).sum / 1Gb)
        $c = "{0:N3} GB" -f ($a + $b)
        $output = $_.Name + "," +  $c + "," + $folder
        Write-Host $output
        $infos += $output
        Clear-Variable a,b,c,output
    }
    Clear-Variable folder1, folder2
}
}

$infos | ogv
Continue reading...

Function Count Ad-GroupMember

#by J.Kühnis 12.11.2019
Function Count-ADGroupMember {
    
    [CmdletBinding()]
    Param(
        [Parameter(Mandatory = $true, ValueFromPipelineByPropertyName = $true)]
        [string]$GroupName
    )


    #Get Data From AD-Group
    $groupname
    $groupdsn = (Get-ADGroup $groupname).DistinguishedName
    $group = [adsi]"LDAP://$groupdsn" 
    $groupmemebrs = $group.psbase.invoke("Members") | ForEach-Object { $_.GetType().InvokeMember("SamAccountName", 'GetProperty', $null, $_, $null) }
    $ADGroupMemberCount = $groupmemebrs.count
    return $ADGroupMemberCount
}

example:

Count-ADGroupMember -GroupName AnyGroupNameHere
Continue reading...

Jobs on PowerShell

Certain processes can take a long time. As an example, if you want to search a specific event log trough several servers.
To counteract this, Powershell has introduced “Jobs, Workflows and Foreach-Parallel”. It should be well estimated what you can use where best. Personally, I like to rely on jobs when it comes to remote querying / remote invocation.

There is a sensational blogpost by Harry Eagles bout the topic:

https://blogs.technet.microsoft.com/uktechnet/2016/06/20/parallel-processing-with-powershell/

I would like to show a small example of how I use Jobs to read out Eventlogs about several machines. In the example, it is only checked if the corresponding log exists or was written in the last 45 minutes. For 128 servers I needed 30 minutes with this parallel Task. I killed the sequential script after 6 hours …

#by J.Kühnis
$Servers = @(
"serverHostname1"
"serverHostname2"
"serverHostname3"
)

Remove-Job *
$outputArray = @()

Foreach ($Server in $Servers){

Start-Job -Name $Server -ArgumentList $Server{
    param($servername)
    IF(Get-EventLog -LogName System -InstanceId '12306' -After (Get-Date).AddMinutes(-45) -ComputerName $servername -ErrorAction Ignore){
    
    Write-Output"$servername  true"
    }Else{
    Write-Output "$servername  false"
    
    }
} 

}

While (Get-Job -State "Running") {
    Clear-Host
    write-host "Jobs Running"  (Get-Job).count
    Start-Sleep 2
}
Clear-Host
Get-Job
write-host "Jobs completed, getting output"

Get-Job | ForEach-Object {
    $a = Receive-Job $_.Id
    $a
    $outputArray += $a
  
}

#Use the variable $outputArray to get or export the Outputdata
Continue reading...

local & remote msu patchfile installation with Powershell / Windows Update Standalone Installer

Windows Update Standalone Installer

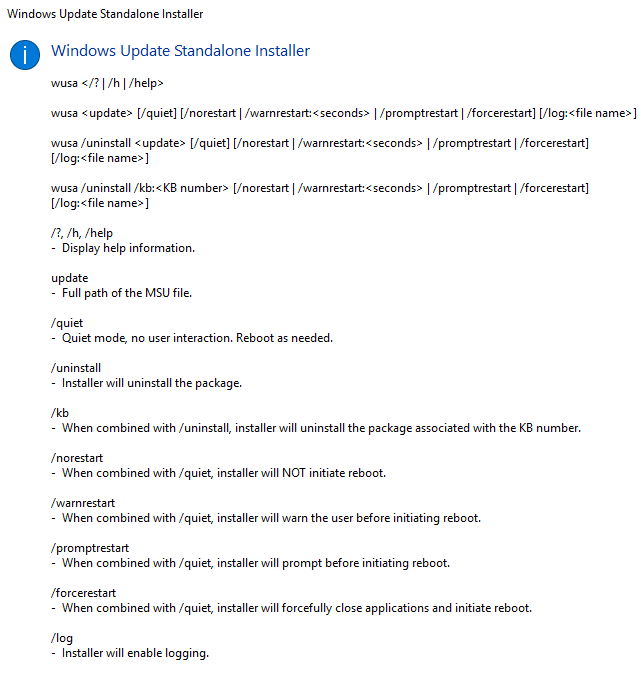
The patch installation is done via wusa.exe.

The following print screen shows the parameters of the Windows Update Standalone Installer.

local installation

As far as I know, the patch cannot be installed with native powershell, means we have to address the wusa.exe in powershell. Of course Powershell is a nice way to automate the whole process.

In the following example, the patch is copied from a UNC share and installed locally.

$patchname = "kb13245.msu"

$patchsource = "\\some\unc\path\kb13245.msu"

Copy-Item $patchsource -Destination "$env:SystemDrive\Temp" -Force

wusa.exe "$env:SystemDrive\Temp\$patchname" /quiet

remote installation

I was not able to run wusa.exe remotely, any tests with workflows, Remotepowershell (Invoke-Command CMDLeet) failed. Even triggering a localy copied batch file caused problems. The wusa.exe process was executed with the correct parameters but aborted after a few seconds.
Even with an Invoke-Command and the parameter -Wait it didn’t work.

Probably it’s because you intervene in the system and perform an unauthorized action.

With the PSExec.exe it is possible to start the process remotely.

The principle is very simple, you have to copy the patch to the appropriate target computer. Then PSExec starts a remote process on the target computer and executes the wusa.exe with the corresponding parameters. The wusae.exe must point to the path where the patch was copied.

#16.05.2019 by JKU
$Hotfix = 'kb-12345.msu'
$HostName = 'F.Q.D.N'
$DestinationPath = "\\$Hostname\c$\Temp\"

Copy-Item C:\temp\$Hotfix -Destination $DestinationPath
#Start Process with PSExec.exe
& C:\Temp\PsExec.exe -accepteula -s  \\$HostName wusa C:\Temp\$Hotfix /quiet /norestart

And so you can distribute a patch for multiple computers with a simple iteration.

full remote automation

There are of course several ready-made scripts to install multiple patches on multiple computers. The script which I use in the company environment, I have inserted below. The code does not come from me, but from the following forum post: https://community.spiceworks.com/topic/2054098-silently-install-patches-remotely-and-reboot?page=1#entry-7246666

#by https://community.spiceworks.com/topic/2054098-silently-install-patches-remotely-and-reboot?page=1#entry-7246666

$RootHotfixPath = 'Patches\'
 
$Hotfixes = @('KB3125574_x64.msu')
$Servers = Get-Content 'MachineList.txt'

foreach ($Server in $Servers)
{
    Write-Host "Processing $Server..."

    $needsReboot = $False
    $remotePath = "\\$Server\c$\Temp\Patches\"
    
        if( ! (Test-Connection $Server -Count 1 -Quiet)) 
    {
        Write-Warning "$Server is not accessible"
        continue
    }

        if(!(Test-Path $remotePath))
    {
        New-Item -ItemType Directory -Force -Path $remotePath | Out-Null
    }
    
    foreach ($Hotfix in $Hotfixes)
    {
        Write-Host "`thotfix: $Hotfix"
        $HotfixPath = "$RootHotfixPath$Hotfix"

        Copy-Item $Hotfixpath $remotePath
        # Run command as SYSTEM via PsExec (-s switch)
        & C:\Windows\PsExec -s \\$Server wusa C:\Temp\Patches\$Hotfix /quiet /norestart
        write-host "& C:\Windows\PsExec -s \\$Server wusa C:\Temp\Patches\$Hotfix /quiet /norestart"
        if ($LastExitCode -eq 3010) {
            $needsReboot = $true
        }
    }

    # Delete local copy of update packages
    Remove-Item $remotePath -Force -Recurse

    if($needsReboot)
    {
        Write-Host "Restarting $Server..."
        Restart-Computer -ComputerName $Server -Force -Confirm
    }
}
Continue reading...

Install Eclipse Plugins from command line

tested with:

Eclipse Java EE IDE for Web Developers – Version: Oxygen.1a Release (4.7.1a)

Eclipse Java EE IDE for Web Developers – Version: 2019-03 (4.11.0)

Basics

There is a nice detailed blog article which describes how to install the Eclipse plugins.
The description is for Linux, it works exactly the same on Windows.
The syntax is shown with an example and it is explained how to get to the repository information.

Here is an example for the Windows Commandline:

C:\Program Files\eclipse\jee-latest-released\eclipse\eclipse.exe -application org.eclipse.equinox.p2.director -repository http://download.eclipse.org/releases/oxygen -installIU org.eclipse.jgit.http.apache.feature.group

However, there are some problems with automation:

  • The plugins cannot be installed in parallel mode, at least this didn’t work for me.
  • Prerequisits will not be automaticly installed.

The automated solution:

First you have to manually try out the commands to get the order and dependencies/prerequsits right.

The loop in the script will sequentially process the installations…if a plugin installation takes more than 5min the Eclipse process will stop and the next plugin will be installed.

Don’t forget ro Run Powershell in elevated mode.

#09.04.2019 by J.Kühnis installation Eclipse Plugins

#Install Eclipse Addons from Web-repository
[array]$InstallArguments = @(
'&"C:\Program Files\eclipse\jee-latest-released\eclipse\eclipse.exe" -application org.eclipse.equinox.p2.director -repository https://tools.hana.ondemand.com/oxygen/ -installIU com.sap.it.ide.adapter.sdk.feature.feature.group'
'&"C:\Program Files\eclipse\jee-latest-released\eclipse\eclipse.exe" -application org.eclipse.equinox.p2.director -repository http://download.eclipse.org/releases/oxygen -installIU org.eclipse.jgit.http.apache.feature.group'
'&"C:\Program Files\eclipse\jee-latest-released\eclipse\eclipse.exe" -application org.eclipse.equinox.p2.director -repository https://tools.hana.ondemand.com/oxygen/ -installIU com.sap.it.commons.command.http.apacheclient'
'&"C:\Program Files\eclipse\jee-latest-released\eclipse\eclipse.exe" -application org.eclipse.equinox.p2.director -repository https://tools.hana.ondemand.com/oxygen/ -installIU com.sap.it.op.cockpit.ui.feature.feature.group'
'&"C:\Program Files\eclipse\jee-latest-released\eclipse\eclipse.exe" -application org.eclipse.equinox.p2.director -repository https://tools.hana.ondemand.com/oxygen/ -installIU com.sap.core.tools.eclipse.help.feature.feature.group'
'&"C:\Program Files\eclipse\jee-latest-released\eclipse\eclipse.exe" -application org.eclipse.equinox.p2.director -repository http://download.eclipse.org/releases/oxygen -installIU org.eclipse.libra.facet'
'&"C:\Program Files\eclipse\jee-latest-released\eclipse\eclipse.exe" -application org.eclipse.equinox.p2.director -repository http://download.eclipse.org/releases/oxygen -installIU org.eclipse.libra.facet.feature.feature.group'
'&"C:\Program Files\eclipse\jee-latest-released\eclipse\eclipse.exe" -application org.eclipse.equinox.p2.director -repository http://download.eclipse.org/releases/oxygen -installIU org.eclipse.jpt.jpadiagrameditor.feature.feature.group'
'&"C:\Program Files\eclipse\jee-latest-released\eclipse\eclipse.exe" -application org.eclipse.equinox.p2.director -repository https://tools.hana.ondemand.com/oxygen/ -installIU com.sap.core.tools.eclipse.server.feature.feature.group'
'&"C:\Program Files\eclipse\jee-latest-released\eclipse\eclipse.exe" -application org.eclipse.equinox.p2.director -repository https://tools.hana.ondemand.com/oxygen/ -installIU com.sap.jvm.profiling.feature.group'
'&"C:\Program Files\eclipse\jee-latest-released\eclipse\eclipse.exe" -application org.eclipse.equinox.p2.director -repository https://tools.hana.ondemand.com/oxygen/ -installIU com.sap.idm.dev-ui-feature.feature.group'
)
                                                                                                             
Foreach($argument in $InstallArguments){
    #Install Addins
    Write-Host $argument -ForegroundColor Yellow
    $argument | Invoke-Expression
    Start-Sleep 5

    #Check if Service is Running and wait | Exit after 300Seconds
    [int]$counter = 0
        
        Do {  
            $ProcessesFound = get-process -Name *eclipse*
            If (($ProcessesFound) -and ($counter -le "30")) {
                Start-Sleep 10
                $counter++
                Write-Host "Still running: $($ProcessesFound)  $counter"
            }Else{
                IF ($counter -gt "30"){
                    Write-Host "Try to kill running Process while Process is taking more than 5 Minutes" -ForegroundColor DarkYellow -BackgroundColor Black
                }Else{
                    Write-Host "Process ended by installer" -ForegroundColor Green
                }
                Get-Process *eclipse* | Stop-Process -Force
            }
        } Until (!$ProcessesFound)

        Clear-Variable -Name counter -Scope Global
        Start-Sleep 2
}
Continue reading...

Copy-Items with folder Structure and Filter in a Foreach-Parallel Workflow

#J.Kühnis 08.03.2019
$Sourcefolder= "\\localhost\C$\Temp\1"
$Targetfolder= "C:\Temp2\1"


$query = Get-ChildItem $Sourcefolder -Recurse | Where-Object {$_.LastWriteTime -gt [datetime]::Now.AddDays(-1)}


workflow CopyJob {
    param (
    [Object[]]$query,
    [String]$Sourcefolder,
    [String]$Targetfolder
    )
    
Foreach($item in $query){
    $dest = $Targetfolder + $item.FullName.SubString($Sourcefolder.Length)
    
    #Write-Host $dest -ForegroundColor Yellow
    Copy-Item $item.FullName -Destination $dest -Force
}
}

CopyJob -query $query -Sourcefolder $Sourcefolder -Targetfolder $Targetfolder
Continue reading...

MCLI Module error after Citrix PVS Update 7.13 to 7.18

After Updating Citrix PVS Server i got an Issue with my PVS Scripts.
I couldn’t load the Powershell modules anymore.

Of course I have properly registered the DLL of the PVS Snapin. I executed the following command as admin in the CMD:

"C:\Windows\Microsoft.NET\Framework64\v4.0.30319\InstallUtil.exe" "c:\program files\citrix\provisioning services console\Citrix.PVS.snapin.dll"

I got this Error:

PS C:\Temp> Add-PSSnapin *

Add-PSSnapin : Cannot load Windows PowerShell snap-in McliPSSnapIn because of the following error: The Windows PowerShell snap-in module C:\Program Files\Citrix\Provisioning Services

Console\McliPSSnapIn.dll does not have the required Windows PowerShell snap-in strong name McliPSSnapIn, Version=7.13.0.13008, Culture=neutral, PublicKeyToken=null.

Solution:

The support article https://support.citrix.com/article/CTX226178 describes some symptomps but the Solution didn’t work.

In my case I had to manually change certain registry keys.

[HKEY_LOCAL_MACHINE\SOFTWARE\Microsoft\PowerShell\1\PowerShellSnapIns\McliPSSnapIn]

You Can also Copy this into a .REG File and run on the PVS Server (Ensure the Versionnumber is equal to your PVS Version):

Windows Registry Editor Version 5.00

[HKEY_LOCAL_MACHINE\SOFTWARE\Microsoft\PowerShell\1\PowerShellSnapIns\McliPSSnapIn]
"PowerShellVersion"="5.1"
"Vendor"="Citrix Systems, Inc."
"Description"="This is a PowerShell snap-in that includes the Mcli-Add, Mcli-Delete, Mcli-Get, Mcli-Help, Mcli-Info, Mcli-Run, Mcli-RunWithReturn, Mcli-Set and Mcli-SetList cmdlets."
"ApplicationBase"="C:\\Program Files\\Citrix\\Provisioning Services Console"
"ModuleName"="C:\\Program Files\\Citrix\\Provisioning Services Console\\McliPSSnapIn.dll"
"CustomPSSnapInType"="McliPSSnapIn.McliPSSnapIn"
"Version"="7.18.0.106"
"AssemblyName"="McliPSSnapIn, Version=7.18.0.106, Culture=neutral, PublicKeyToken=null"

Continue reading...