Jere's Techblog

Backup & Restore Citrix Storefront Configuration with Powershell

Backup

Ensure you’re running Powershell as Administrator and you loaded the StoreFront Powershell Modules:

Get-Module "Citrix.StoreFront.*" -ListAvailable | Import-Module

Export STF Configuration

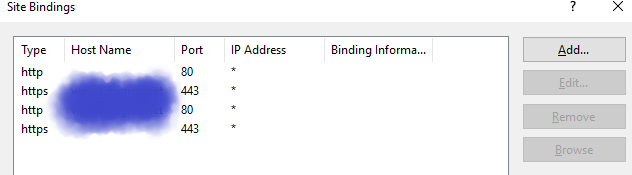
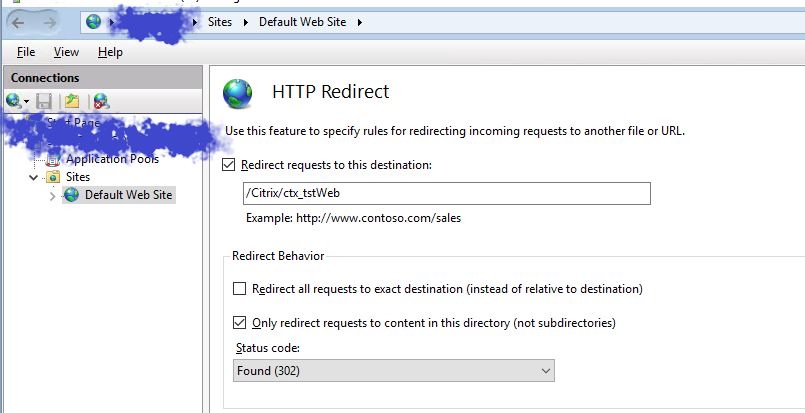
Export-STFConfiguration -TargetFolder "C:\temp" -ZipFileName "31.01.2019_STF_Backup" -NoEncryption -Confirm:$false

The IIS settings will be not saved. For example, IIS bindings to the default web site or HTTP Redirect entries that were made, will not be imported when you restore the backup ZipFile.

You can also take an IIS Configuration Backup.

Unfortunately, not all settings will be exported from the IIS here either…
Therefore I recommend to make a backup of the server (VM Snapshot or similar) another method is to keep an installation documentation about the manual IIS configuration and to recheck the config after a configrestore.

$a = [datetime]::Today.ToString('dd.MM.yyy')

function IISBackupCreate {cmd /c C:\WINDOWS\System32\inetsrv\appcmd.exe add backup $a}
IISBackupCreate

Restore

Citrix Config Restore:

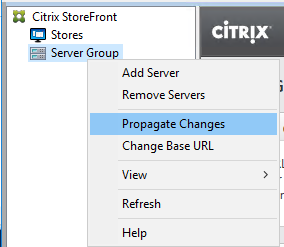
Import-STFConfiguration -ConfigurationZip C:\Temp\31.01.2019_STF_Backup.zip

Afterwards you have to propagate the Storefront Configuration.


Restore IIS Config:

To restore IIS Configuration ensure you define the variable “$a” in the script above with the name of the Backupfolder.

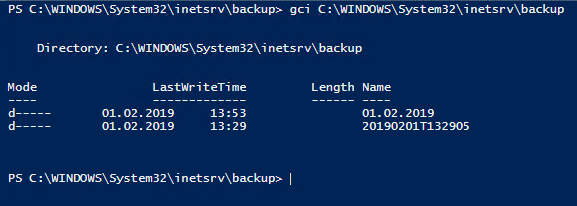
You can find those Folders under “C:\WINDOWS\System32\inetsrv\backup”

#$a = "20190201T132905"      
function IISBackupRestore {cmd /c C:\WINDOWS\System32\inetsrv\appcmd.exe restore backup $a}
IISBackup

iisreset

IIS Custom settings are not synchronized with Storefront Propagate function. The restore must be done on every storefront server.

Continue reading...

Citrix Broker Count Users

Here are some Powershell possibilities to get the amount of sessions or Citrix’s Unique sessions.

Get all Citrix Sessions:

(Get-BrokerSession -MaxRecordCount 100000).count

Get the numbers of sessions per user:

Get-BrokerSession -MaxRecordCount 100000 | group-object UserName | Sort-Object -Descending count

You will get a list with Usernames (SamAccountName) and the Number of Sessions per User

Get the amount of logged in Users:

(Get-BrokerSession -MaxRecordCount 100000 | group-object UserName).count
Continue reading...

Visual Studio Code

One of my favorite editors for editing Powershell scripts is Visual Studio Code. Mircosoft’s OpenSource Code Editor, launched in 2016, is a wonderful editor and the biggest advantage is that it works on Windows, Linux and Mac.

In this article I want to show some advantages why I prefer this editor to the classic Powershell_Ise, Atom Editor and Notepad++. I also show useful addons and editor settings.

Okay first of all i’ll show you why

At the beginning I will show you the advantages of the editor:

  • The editor is very fast (no lags) and it starts very fast
  • The editor is with approx. 180MB installation size relatively slim in contrast to Visual Studio
  • The editor supports various programming and scripting languages, which can be installed using extensions.
  • Many Addons/Extensions (Debugger, DebugConsole, ColorEditors, Autocorrection, Sourcecontrol, GIT, TFS Server, Docker, various Azure Tools and Connections)
  • Code can be executed within the editor.
  • Integrated Terminal Console
  • Many configuration options (autosave, color selection, editor behavior, code arrangement and much more).
  • Command Explorer
  • Various color themes for the editor itself (dark / light, much based on Visual Studio)
  • Configuration can be easily done using .json files or GUI
  • Has a very large user community and is strongly pushed by Microsoft.

Distinctive differences to Visual Studio Editor:

  • Visual Studio Code organizes itself according to folder structures (file system) and not like Visual Studio with “Projects”
  • No integrated editor for Windows WPF/Windows Form GUI’s.
  • No Enterprise Debugging (CPU Runtime)

Those are my prefferd Custom Settings:

I have made the following setting in the JSON file (User Settings) to make the scripten more pleasant.

“powershell.integratedConsole.focusConsoleOnExecute”: false,

“powershell.scriptAnalysis.enable”: true,

“powershell.codeFormatting.openBraceOnSameLine”: true

Continue reading...

Linux Change TLS-SNI-01 because TLS-SNI-01 validation is reaching end-of-life

Two days ago I received the mail below.
TLS-SNI-01 will no longer be supported in the future. With this guide I’ll show you how to update the Let’s Encrypt certificate to the new standards. In my concrete example it is a Debian System 9.7 (Stretch) with a Nextcloud (Apache webserver) and certbot.

Your Let’s Encrypt client used ACME TLS-SNI-01 domain validation to issue
a certificate in the past 60 days. Below is a list of names and IP
addresses validated (max of one per account):

************

TLS-SNI-01 validation is reaching end-of-life. It will stop working
temporarily on February 13th, 2019, and permanently on March 13th, 2019.
Any certificates issued before then will continue to work for 90 days
after their issuance date.

You need to update your ACME client to use an alternative validation
method (HTTP-01, DNS-01 or TLS-ALPN-01) before this date or your
certificate renewals will break and existing certificates will start to
expire.

First of all ensure you have certbot version 0.28.0 oder newer installed. Ensure your usig those comnmands with the root/admin user.

 certbot --version || /path/to/certbot-auto --version

If the version is older, use the following link to update Certbot.

https://certbot.eff.org/

Use only the install section of the instructions to update the certbot application. With my Debian example it is the following command:

apt-get install certbot python-certbot-apache -t stretch-backports

Now you have to remove the references to tls-sni-01 in your renewal configuration:

sh -c "sed -i.bak -e 's/^\(pref_challs.*\)tls-sni-01\(.*\)/\1http-01\2/g' /etc/letsencrypt/renewal/*; rm -f /etc/letsencrypt/renewal/*.bak"

To finish, a dry renewal with certbot must be carried out.

certbot renew --dry-run

Here you can find detailed information about Let’s Encrypt update with Certbot. https://community.letsencrypt.org/t/how-to-stop-using-tls-sni-01-with-certbot/83210

and with this link you will find general information about the TLS-SNI-01 expiration https://community.letsencrypt.org/t/february-13-2019-end-of-life-for-all-tls-sni-01-validation-support/74209

Continue reading...

Test TCP Networkports with Powershell

http://portquiz.net/ is a great Website to test any outbound TCP Port.

Of course there are a lot Programm who can check which TCP Ports are open. But i’ll show you a way how you can test the Ports with Powershell.
$16bitint = 1..65535 
foreach ($port in $16bitint) {
    IF (Test-NetConnection -ComputerName portquiz.net -InformationLevel Quiet -Port $port){
          Write-Host $port 
    } 
}

Continue reading...

Rename vLan PowerCLI

This script changes the vLan name of each network adapter within a vCenter.
The script works with PowerCLI (tested with version 6.0 /6.5).

The following variables should be adjusted in the script.
$vcserver = “Specify FQDN.of.vcenter.”.
$VPGName = “Specify the current vLan name”.
$VPGNameNew = “Specify the new vLan name”.

# by Jeremias Kühnis
#check if vmware modules are loaded
function checkmodule {

    If (!(Get-PSSnapin * | where { $_.Name -eq 'VMware.VimAutomation.Core'})) {Add-PSSnapin *}


        if (-not (Get-PSSnapin -Name 'VMware.VimAutomation.Core')) {
            write-host "VMWare PSSnapin is not loaded - PSSession/Windows will be closed in 10 seconds" -backgroundcolor "Yellow" -ForegroundColor "red"
            sleep 10
            exit
            }
        else{
        Write-Host "VMWare PSSnapin loaded" -ForegroundColor "Green"
        }
}

# VCenter you are connecting too
function connectserver{

    $vcserver= 'any.vCenter.FQDN'
    Connect-VIServer $vcserver
}

function renamevpg{
# Change VirtualPortGroup / VLANS
    $VPGName = 'XD_2011' # Variable Vlan
    $NewVPGName ='XD_2011_new'#Variable new VLAN Name

    #Set the name of the "Standard-Virtual Switch"
    $VPG = Get-VirtualPortGroup -Name $VPGName
    Set-VirtualPortGroup -VirtualPortGroup $VPG -Name $NewVPGName
    Start-Sleep 30
   # Loop to make changes to new Network Adapter

    ForEach ($adapter in (Get-NetworkAdapter * | where {$_.NetworkName -eq $VPGName})){
    Set-NetworkAdapter -NetworkAdapter $adapter -NetworkName "$NewVPGName" -Confirm:$false
    Write-Host $adapter
    }
}

checkmodule
connectserver
renamevpg
Continue reading...