I way toying arround with Discord and Python because I wanted to record the messages and reactions of users. Therefore I wrote a bot with the library discord.py My first attempts with Python…or let’s say a try and error session….
But in the end I was able toget the reactions and log messages.
below some good references and instructions and an example of my discord bot
import discord
from discord.ext import commands

client = commands.Bot(command_prefix='.')

@client.event
async def on_ready():
   #a = discord.utils.get(client.get_all_members(),name="Test-User", discriminator="9635").id  #GetUserID
    print('Bot is ready.')


"""  crawl message
@client.event
async def on_message(message):
    if str(message.author) == 'Test-user#111':
         print(f'{message.content} RECEIVED!.')
    else:
        print(f'{message.content} wrong User!.')
"""

#get reaction an log it on another channel crawl message with some condition as an example
@client.event
async def on_reaction_add(reaction, user):
    channel = client.get_channel(6637461198)
    print(f'{reaction}')
    if str(reaction.message.author.id) == '579155970803':
        if str(user.id) != '57915597803':
            await channel.send('[{0.display_name}] -  {0} has reacted with {1.emoji}!; ID = {1.message.id} '.format(user, reaction))
client.run(' some API-DiscordServer String here ')
I’m a big WordPress fan! The community is huge, it has lots of plugins and it is very user friendly. Compared to a CMS like Typo3, simple end users can manage WordPress very easily and create posts, as well as customize pages.
This post shows some of my favorite addins and explains their function:
Secret Content– hide content from non logged in visitors
Post Expirator– The Post Expirator plugin allows the user to set expiration dates for both posts and pages.
NextGEN Gallery– The most popular gallery plugin for WordPress and one of the most popular plugins of all time with over 24 million downloads.
Members – Members is a plugin that extends your control over your blog. It’s a user, role, and capability editor plugin that was created to make WordPress a more powerful CMS.
During the migration from Server 2008 R2 – Citrix 6.5 to Server 2016 Citrix 7.15, the customer had a special request: that the language settings, printer mappings and Outlook shared mailboxes be transferred to the new Server2016/Office 2016 environment. Of course, we don’t want to copy the full Windowsprofile, instead we want only use the most necessary settings to keep the new profile as clean as possible. With the printer mappings and language settings there are so far no problems, all this can be found “relatively simply” in the Registry and taken over (Powershell is your friend).
With the Outlook shared mailboxes it was more complicated…we had in this specific case no possibility to get the relation between the assigned shared mailboxes and the users trough Exchange…the Exchange admin told us that you can’t read the relations with the current Exchangeserver settings.
Although you can technically read the members of a shared mailbox with get-mailbox or a similar command.
Probably you could also mount the shared mailboxes automatically to Outlook…if you like…but honestly, that’s not the point. And i’m not an MS-Exchange professional…😉
You can actually get Outlook profiles/mounted shared mailbox (profiles can be seen under CMD: “c:\Windows\SysWOW64\control.exe mlcfg32.cpl“)from the user registry. It may not be the best way but it works and offers a small advantage. You migrate only those shared mailboxes which the user has assigned to himself in the current Outlook version. You will not randomly migrate all shared mailboxes to the new Outlook environment just because the user is a member of those.
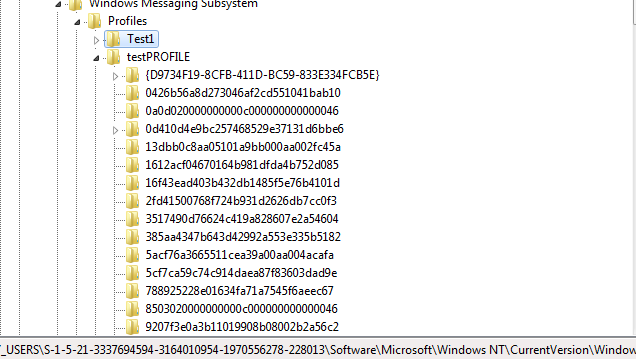
To cut a long story short… What needs to be done now to migrate the mounted mailboxes/profiles from Office 2010/Server2008R2 to Office2016/Server2016? First an export of the Outlook profiles: HKCU\Software\Microsoft\Windows NT\CurrentVersion\Windows Messaging Subsystem\Profiles
Watch your step! This cannot be imported easily…because the path has changed ( Thank you Microsoft!).
New path under Office 2016 (Import to these location): HKCU\SOFTWARE\Microsoft\Office\16.0\Outlook\Profiles
There are a lot of cryptic registry keys but so far the migration and the Outlookprofiles hasn’t caused any problems. Write me in the comments, if you know the specific key’s which are needed to migrate shared mailboxes (so I can make everything a less streamlined and cleaner)…I don’t take this trouble today 🙂
You have to define the $root variable, it can be something like ‘$root = “$env:appdata\Profilmigration7x”‘ or a Network share. If you use the Appdata path, ensure to Copy the data to the “NEW” appdata-path if you use Citrix or another UPM versioning tool.
Perhaps you remember the moment when you found out that you can replace the text at the cursor position with the “Insert” key and that it will no longer insert the text but overwrite it at this position. This was a WOW-effect for me “finally I know how to switch off this stupid function”. With regard to users who work exclusively or very much with the keyboard; as in the old DOS times or today on Linux (with editors like vim /nano) this makes sense. I’m always amazed that there are users who don’t know this. If they accidentally press the key, they restart the PC to fix this “error”.
But there is one more thing that only a few people know. After all, the nice thing about IT is that you never stop learning and you learn every day something new.
About 5 years ago I asked myself how I could remove the first character on every line from a list. The list had about 4000 characters…so a manual intervention was out of the question. I thought: “There are some ways to do this, e.g. with a simple loop script or by concatenating characters/words in Excel”. But to be honest my script/programming knowledge was virtually non-existent at that time and I didn’t have time for the Excel crafting either…it had to be an easy way, because it was an important file that had to be edited fast.
Then I asked myself if you could simply mark “vertically” with the mouse cursor and delete the corresponding character.
Google gave me the answer! Since then I use this method very often to edit files.
And now for the trick: “SHIFT + ALT” with the arrow keys “UP/Down” serve as navigation for the vertical marking.
Unfortunately not all programs/editors support this (e.g. the normal Windows Notepad program can’t do this).
I have successfully tested this function with the following programs:
Atom Editor
Notepad++
Powershell_ISE
Atom Editor
Visual Studio
Visual Studio Code (depending on the user/profile setting).
It is also possible to mark whole blocks by using the arrow keys “SHIFT + ALT” & “UP/Down + Left/Right”.