Personally I am a huge fan of NextCloud currently I run 4 environments with over total over 100 users. Already in the beginnings of OwnCloud I have been working with it and I switched relatively quickly to the fork “NextCloud”. It seems to me that a lot has happened since the fork, the community has grown much bigger. Another advantage is that you have your own DataShareing solution without using commercial products.
I would like to present you my Top 5 solutions, which I use on every NextCloud environment.
With WPF GUI elements, it can happen that you like to connect two detached elements with each other. A classic example are comboboxes within tables. You want to read the value of the combobox with the corresponding row. For this the binding of elements is necessary. Enclosed a small example, how you can accomplish this:
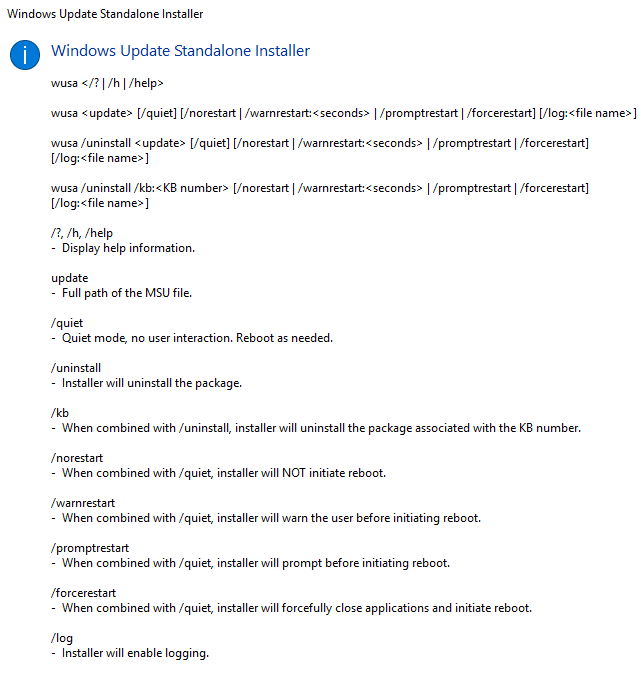
The following print screen shows the parameters of the Windows Update Standalone Installer.
local installation
As far as I know, the patch cannot be installed with native powershell, means we have to address the wusa.exe in powershell. Of course Powershell is a nice way to automate the whole process.
In the following example, the patch is copied from a UNC share and installed locally.
I was not able to run wusa.exe remotely, any tests with workflows, Remotepowershell (Invoke-Command CMDLeet) failed. Even triggering a localy copied batch file caused problems. The wusa.exe process was executed with the correct parameters but aborted after a few seconds. Even with an Invoke-Command and the parameter -Wait it didn’t work.
Probably it’s because you intervene in the system and perform an unauthorized action.
With the PSExec.exe it is possible to start the process remotely.
The principle is very simple, you have to copy the patch to the appropriate target computer. Then PSExec starts a remote process on the target computer and executes the wusa.exe with the corresponding parameters. The wusae.exe must point to the path where the patch was copied.
#16.05.2019 by JKU
$Hotfix = 'kb-12345.msu'
$HostName = 'F.Q.D.N'
$DestinationPath = "\\$Hostname\c$\Temp\"

Copy-Item C:\temp\$Hotfix -Destination $DestinationPath
#Start Process with PSExec.exe
& C:\Temp\PsExec.exe -accepteula -s  \\$HostName wusa C:\Temp\$Hotfix /quiet /norestart
And so you can distribute a patch for multiple computers with a simple iteration.
It is especially useful if you have to work with a driveletter in the code or if the share has to be mapped in the Scirpt and has to be removed at the end of the script.
You can get an overview of all Users trough this Command:
Get-MsolUser
This script block can be used to assign a license to any user who is not a licensed user.
This example assumes that the command “(Get-MsolAccountSku).accountskuid” retrive only one value/license. If you have several licenses you have to specify this for the variable “$SKUID“.
#byJKU 29.04.2019
#Activate each user with MSolAccountSKU License
$SKUID= (Get-MsolAccountSku).accountskuid

IF ((Get-MsolUser -UnlicensedUsersOnly).UserPrincipalName){
    (Get-MsolUser -UnlicensedUsersOnly).UserPrincipalName | % {
    Set-MsolUserLicense -UserPrincipalName $_ -AddLicenses $SKUID
    }
}Else{
    Write-host "There is no User without License" -ForegroundColor Yellow
}
Eclipse Java EE IDE for Web Developers – Version: Oxygen.1a Release (4.7.1a)
Eclipse Java EE IDE for Web Developers – Version: 2019-03 (4.11.0)
Basics
There is a nice detailed blog article which describes how to install the Eclipse plugins. The description is for Linux, it works exactly the same on Windows. The syntax is shown with an example and it is explained how to get to the repository information.
The plugins cannot be installed in parallel mode, at least this didn’t work for me.
Prerequisits will not be automaticly installed.
The automated solution:
First you have to manually try out the commands to get the order and dependencies/prerequsits right.
The loop in the script will sequentially process the installations…if a plugin installation takes more than 5min the Eclipse process will stop and the next plugin will be installed.
Don’t forget ro Run Powershell in elevated mode.
#09.04.2019 by J.Kühnis installation Eclipse Plugins

#Install Eclipse Addons from Web-repository
[array]$InstallArguments = @(
'&"C:\Program Files\eclipse\jee-latest-released\eclipse\eclipse.exe" -application org.eclipse.equinox.p2.director -repository https://tools.hana.ondemand.com/oxygen/ -installIU com.sap.it.ide.adapter.sdk.feature.feature.group'
'&"C:\Program Files\eclipse\jee-latest-released\eclipse\eclipse.exe" -application org.eclipse.equinox.p2.director -repository http://download.eclipse.org/releases/oxygen -installIU org.eclipse.jgit.http.apache.feature.group'
'&"C:\Program Files\eclipse\jee-latest-released\eclipse\eclipse.exe" -application org.eclipse.equinox.p2.director -repository https://tools.hana.ondemand.com/oxygen/ -installIU com.sap.it.commons.command.http.apacheclient'
'&"C:\Program Files\eclipse\jee-latest-released\eclipse\eclipse.exe" -application org.eclipse.equinox.p2.director -repository https://tools.hana.ondemand.com/oxygen/ -installIU com.sap.it.op.cockpit.ui.feature.feature.group'
'&"C:\Program Files\eclipse\jee-latest-released\eclipse\eclipse.exe" -application org.eclipse.equinox.p2.director -repository https://tools.hana.ondemand.com/oxygen/ -installIU com.sap.core.tools.eclipse.help.feature.feature.group'
'&"C:\Program Files\eclipse\jee-latest-released\eclipse\eclipse.exe" -application org.eclipse.equinox.p2.director -repository http://download.eclipse.org/releases/oxygen -installIU org.eclipse.libra.facet'
'&"C:\Program Files\eclipse\jee-latest-released\eclipse\eclipse.exe" -application org.eclipse.equinox.p2.director -repository http://download.eclipse.org/releases/oxygen -installIU org.eclipse.libra.facet.feature.feature.group'
'&"C:\Program Files\eclipse\jee-latest-released\eclipse\eclipse.exe" -application org.eclipse.equinox.p2.director -repository http://download.eclipse.org/releases/oxygen -installIU org.eclipse.jpt.jpadiagrameditor.feature.feature.group'
'&"C:\Program Files\eclipse\jee-latest-released\eclipse\eclipse.exe" -application org.eclipse.equinox.p2.director -repository https://tools.hana.ondemand.com/oxygen/ -installIU com.sap.core.tools.eclipse.server.feature.feature.group'
'&"C:\Program Files\eclipse\jee-latest-released\eclipse\eclipse.exe" -application org.eclipse.equinox.p2.director -repository https://tools.hana.ondemand.com/oxygen/ -installIU com.sap.jvm.profiling.feature.group'
'&"C:\Program Files\eclipse\jee-latest-released\eclipse\eclipse.exe" -application org.eclipse.equinox.p2.director -repository https://tools.hana.ondemand.com/oxygen/ -installIU com.sap.idm.dev-ui-feature.feature.group'
)

Foreach($argument in $InstallArguments){
    #Install Addins
    Write-Host $argument -ForegroundColor Yellow
    $argument | Invoke-Expression
    Start-Sleep 5

    #Check if Service is Running and wait | Exit after 300Seconds
    [int]$counter = 0

        Do {
            $ProcessesFound = get-process -Name *eclipse*
            If (($ProcessesFound) -and ($counter -le "30")) {
                Start-Sleep 10
                $counter++
                Write-Host "Still running: $($ProcessesFound)  $counter"
            }Else{
                IF ($counter -gt "30"){
                    Write-Host "Try to kill running Process while Process is taking more than 5 Minutes" -ForegroundColor DarkYellow -BackgroundColor Black
                }Else{
                    Write-Host "Process ended by installer" -ForegroundColor Green
                }
                Get-Process *eclipse* | Stop-Process -Force
            }
        } Until (!$ProcessesFound)

        Clear-Variable -Name counter -Scope Global
        Start-Sleep 2
}
The problem is unfortunately still current it just brings some changes with Microsoft Server 2016. Therefore I took the liberty to copy some explanations from the “old article”.
Problem Description
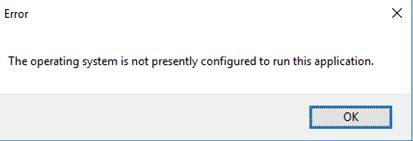
During a recent application implementation project, we ran into the following issue. Some App-V applications, which were installed locally in the PVS image, were unable to start or they were throwing various error messages. One of the applications which were showing errors, was MS Office (Word, Excel, Powerpoint) viewer. The error thrown at startup of the application was the following: “The operating system is not presently configured to run this application.”
The App-V client was 5.0 SP2, but App-V 5.0 SP3 was also used as a troubleshooting step. The PVS target devices were configured as such: Streamed disk Persistent disk (flush overflow) Re-installing the application in the image, solved the issue for that particular application. However, we wanted to know the root cause of this issue, so we logged a case at Citrix. This was done because the behavior was not existing on a regular non-streamed VM. After extensive troubleshooting together with Citrix support we discovered the root cause: One of the registry keys (HKLM\SOFTWARE\Microsoft\AppV\MAV\Configuration\Packages\<package ID>) containing the PackageRoot value contained a faulty HarddiskVolume number. This volume was indicated as 3, whereas the streamed disk volume number was 2.
Solution
Correcting HarddiskVolume3 into HarddiskVolume2 did solve the issue. The reason why the HarddiskVolume3 value got into the registry was because these applications where installed in the image on the template machine. This was the machine from which the initial vdisk was captured. During the installation of the particular App-V applications, the original disk was still attached .
This is issue is definitely not Citrix or PVS related, but can be encountered on such a setup. To prevent this issue from happening again in the future, the original disk was detached from the template VM.
You can get the disknumber in CMD with “DISKPART -> ListDisk” or PowerShell “Get-Disk”.
My expirience and solution with this issue on Server 2016:
In our Environment we ran into the same problem and we could fix this on Server 2008R2 & Citrix 6.5, PVS 7.15 with the modification of one of the registry keys (with a Startupscript during worker boot). (HKLM\SOFTWARE\Microsoft\AppV\MAV\Configuration\Packages\<package ID>) containing the PackageRoot value contained a faulty HarddiskVolume number.
On Server 2016 (Citrix 7.17) everything was useless. Creating or deleting a disk on the masterimage or changing the RegKey didn’t work. I also didn’t find a way to change the disk volume number.
The problem
could only be solved by adjusting the call parameter of the application. If the
application is started in the App-V context it works fine.